
2014 was the year outbound, cold email went mainstream.
But when every marketer starts doing something, the channel became saturated and less effective. This cheat sheet will teach you a new strategy to personalizing emails with more than just words.
Cold Email 101
Before embarking on new techniques, make sure you first understand these table stakes to success in cold email:
- Be personable, use first names vs. “Mr” or “Hi”
- Don’t email on Monday / Friday
- Always follow-up, even up to 7 times, to maximize response rate
- Ask questions, don’t make assumptions about their needs
- Talk about them, not about you
Cold Email 202
Consumer savviness increases in-step with marketer savviness.
Example 1: content strategists using data to drive email campaign touch points, then Gmail launching the tabbed inbox.
Example 2: technical marketer uses ad-lib generator to write an email (“Hi, I found you on Product Hunt…”), then consumers learn what APIs do.
So where do we go from here? Is cold email dead? I don’t think so, and I set out to prove it. (Note: since writing this post I’ve quit cold email.)
Following are step by step instructions to significantly improve your cold email warm response rate.
Step 1: Commit
We created a way to scale image personalization, which you can fine-tune for your business. But you’ll need a few hours and team buy-in to make this process a reality.
So before you rush through this guide, try custom imagery with your prospects on a 1:1 basis to see if it works.
Step 2: Setup
Now that you’re getting higher response rates from embedding custom images in your cold email, it’s time to configure the infrastructure.
Here’s what you’ll need:
- Google Drive desktop app or Dropbox
- Cyberduck
- Photoshop
Plus a dedicated S3 Bucket, preferably with a short and neutral name because it will be client-facing.
Step 3: Automate Image Creation
Since you’ve already made custom images for prospects, it’s time to stop doing that. Open Photoshop and create an Action that automates file creation.
For Kisi this was a 3-step process:
- Find a prospect’s logo
- Resize it to 140 x 40px (Photoshop > File > Scripts > Image Processor > Resize to Fit)
- Place logo on mock
Here’s what the Kisi Photoshop Action looks like for Step #3 above:
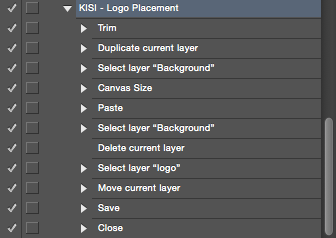
If you’ll be combining files (KISI combines logos + mockups), be sure to include a ‘save’ and ‘close’ step. Save the file wherever you want, and then File > Close to remove the tab from your Photoshop browser. More on this later.
Now test it. (Note: the asterisks only apply if you’re combining two files, ie: logo + static image).
- Open the static image in Photoshop, then select-all and copy the image to your clipboard. Close image.*
- Open all the files you want to place on the #1 image. Do this with File > Open > Choose Folder (1 shot).*
- Create a folder with your G Drive / Dropbox for the final output, ie: “Placed logos”
- Run a batch operation (File > Automate > Batch) using the Action, Opened Files, and Destination > Folder settings. The Folder you choose should be the one you created above in Step #3.
- Voilà, you should have a folder full of custom images.
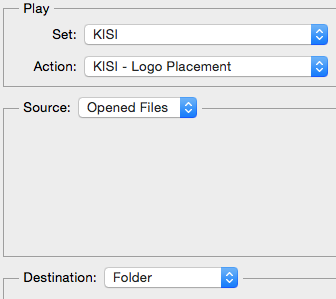
Your batch operation will look like this, and you can set the folder destination at the bottom.
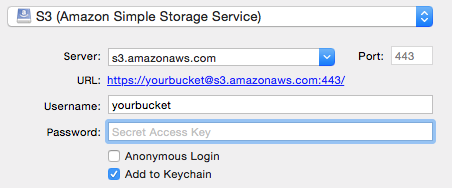
Step 4: Upload Images to S3
We need an S3 Bucket because Amazon doesn’t obfuscate file locations like Dropbox and Google Drive.
Example: https://sprinkleai.s3.amazonaws.com/sprinkle-logo.png
With Cyberduck installed, connect to your S3 Bucket.
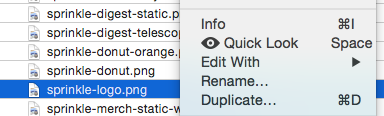
Next, drag your folder of images into your bucket.
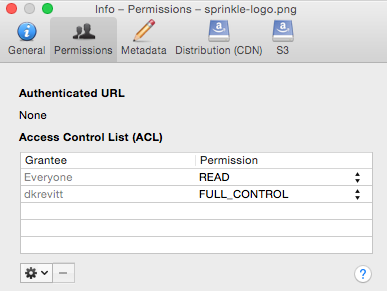
Finally, select all the images (cmd+A / ctrl+A) then right-click (ctrl+click) and select Info:
Now for a critical setting update.
For clients to see the files you upload to S3, you must mark them Public for Everyone. Just click the dropdown cog in the bottom left for Everyone, then the dropdown under ‘Permissions’ to add READ:
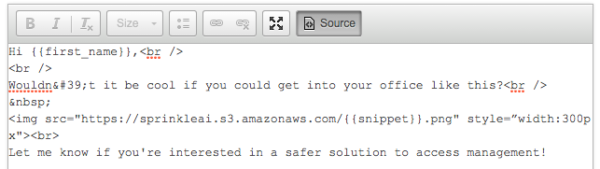
I used PersistIQ to send the emails. If you’re using them too, create a new template. Next click ‘source’ and paste this where you want the image:
<img src="https://BUCKETNAME.s3.amazonaws.com/.png" style=”width:300px"><br>
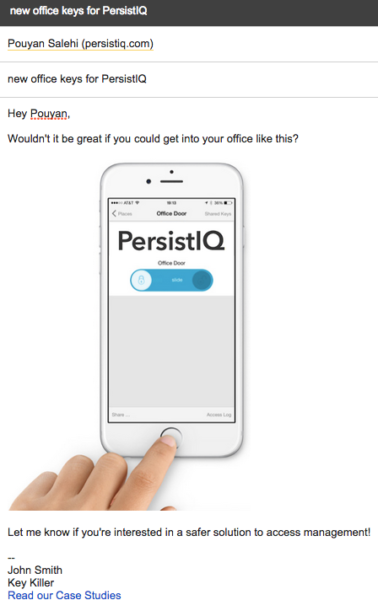
It should look kinda like this:
You’ll notice a couple things:
- We’re using the “snippet” field in PersistIQ to store the file names. Create a consistent naming convention for the files your Photoshop action creates. We prefer using a prospect’s domain, ie: snippet = cocacola for prospect [email protected].
- The 300px width is important for email client readability. Displaying the raw image could not only skew your message text, but it will likely cause a lag in the load-time and thus create a bad user experience.
If you’re not using Persist to send emails, that’s OK too. Just create a merge tag with the file naming convention described above.
[Bonus] Case Study
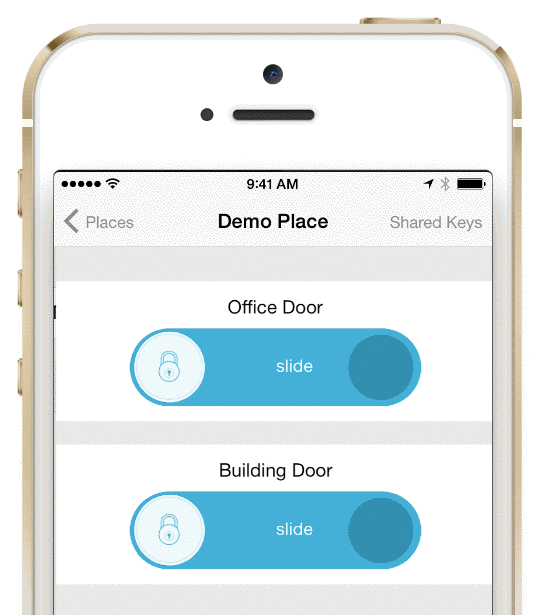
We tried this with our client, Kisi, who offers keyless entry for commercial buildings with a slick mobile app.
While their product is great, it’s invisible. This is oft a challenge for utilities — sticky, but not sneezable. Until you change it with our image personalization strategy. ;)
Here’s a demo of Kisi’s mobile app that opens office doors:
Rather than cold emailing prospects with a tell, Kisi emails prospects with a show.
Instead of forcing readers to imagine the solution, we handed it to them on a platter. And we did it at scale, to the tune of 100s of prospects weekly.
Summary
With a batch of leads, Photoshop, Cyberduck, and a bit of grit, you can significantly improve your cold outreach personalization.
Besides images generally speaking louder than words:
- people love seeing their own logo
- emails with images allow you to “say” less and “show” more
- images are more interesting to share with colleagues than text
If you run a similar campaign for your company, I’d love to hear about it.